继续记录每章的学习,初识flux和redux
Flux
增加多几个文件夹:view(存放视图js)、store(存放变量的js)
1.导入Dispatcher,并返回一个Dispatcher对象。
\\ AppDispatcher.js
import {Dispatcher} from {flux}
export default new Dispatcher()
2.定义一个action,使action函数调用一次Dispatcher.dispatchfe
\\ ActionTypes.js
export const INCREMENT='increment'

\\ Actions.js

import * as ActionTypes from './ActionTypes.js'
import AppDispatcher from ’. / AppDispatcher.js ’;
export const increment = (counterCaption) => {
    AppDispatcher.dispatch({
    type: ActionTypes.INCREMENT,
    counterCaption: counterCaption});
};
3.在Store管理变量,有多个Store对象,Store对象继承EventEmitter,使用事件来管理。
import AppDispatcher from '../AppDispatcher.js';

CounterStore.dispatchToken = AppDispatcher.register (( action) => {
    // 由于register函数无法限制action的输入,当Dispatcher分发一次,Dispatcher会执行register所绑定的回调函数,所以需要使用if/else或者switch/case来选择使用哪一个action
    if (action.type === ActionTypes.INCREMENT ) {
        counterValues[action.counterCaption]++;
        CounterStore.emitChange ();
    }
});
4.在view中调用Action。
  onClickIncrementButton() {
    Actions.increment(this.props.caption);
  }
Redux
使用react与使用flux有些不同。
- 唯一数据源,不需要建立Store文件夹来存放数据。
- Action中不需要调用dispatch函数,只需要返回一个对象。初始化则是将调用createStore(render,initValues),render为Render.js返回的对象。
\\ Reduce.js 替代AppDispatcher.js
import * as ActionTypes from './ActionTypes.js';

export default (state, action) => {
  const {counterCaption} = action;

  switch (action.type) {
    case ActionTypes.INCREMENT:
      return {...state, [counterCaption]: state[counterCaption] + 1};
    case ActionTypes.DECREMENT:
      return {...state, [counterCaption]: state[counterCaption] - 1};
    default:
      return state
  }
}

\\ Store.js
import {createStore} from 'redux';
import reducer from './Reducer.js';

const initValues = {
  'First': 0,
  'Second': 10,
  'Third': 20
};

const store = createStore(reducer, initValues);

export default store;
3.在view中让store分发状态的改变
  onIncrement() {
    store.dispatch(Actions.increment(this.props.caption));
  }
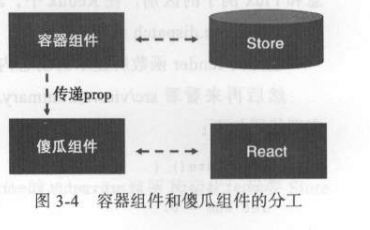
聪明组件和傻瓜组件
聪明组件主要负责与Store做交互,分发到Store使某个值更新。傻瓜组件主要根据props来渲染界面。
多组件共用上下文
Store不需要在每一个react组件中都引入一次,可以在最上层作为props参数导入给子组件。 创建一个Provide组件,不做任何操作,只渲染子组件,并且导入store
\\ Provider.js
import {PropTypes, Component} from 'react';

class Provider extends Component {

  getChildContext() {
    return {
      store: this.props.store
    };
  }

  render() {
    return this.props.children;
  }

}

Provider.propTypes = {
  store: PropTypes.object.isRequired
}

Provider.childContextTypes = {
  store: PropTypes.object
};

export default Provider

\\ index.js

import store from './Store.js';
import Provider from './Provider.js';

ReactDOM.render(
  <Provider store={store}>
    <ControlPanel />
  </Provider>,
  document.getElementById('root')
);

\\ Counter.js
constructor(props, context) {
    super(props, context);
}

onIncrement() {
    this.context.store.dispatch(Actions.increment(this.props.caption));
}
react-redux组件
- react-redux组件的导入,使得上下文的使用更加简单了。Provider不需要自己编写,由react-redux导入。react-redux要求传入Provider组件的store必须是一个包含 subscribe,dispatch,getState的对象。
- 使用connect连接了容器组件和傻瓜组件。mapStateToPropFs将Store 上的状态转化为内层组件的 props,mapDispatchToProps把内层傻瓜组件暴露出来的函数类型的 prop 关联上 dispatch 函数的调用。
\\ Counter.js
function mapStateToProps(state, ownProps) {
  return {
    value: state[ownProps.caption]
  }
}

function mapDispatchToProps(dispatch, ownProps) {
  return {
    onIncrement: () => {
      dispatch(Actions.increment(ownProps.caption));
    },
    onDecrement: () => {
      dispatch(Actions.decrement(ownProps.caption));
    }
  }
}

const Counter = ({value,onIncrement,onDecrement})=>(
  <div>{value}</div>
)

export default connect(mapStateToProp,mapDispatchToPropsv)(Counter)